Showing posts with label Tips. Show all posts

Tuesday, April 7, 2009

sheep by step

Here are the step by step photos of the sheep in the painting from the last post. I was hoping that a few of you would find this interesting, so I took a few pictures along the way.
I was going to just leave out the text explaining my steps, but I added a few words at the end. I think the steps speak for themselves. Besides, they say a picture is worth a thousand words.


Frank Gardner © 2009


I picked a few sheep from different photos and painted the dark shapes to place them. Next I added the blue to continue building up the form. Then I painted in the white highlights of the backlit sheep. That is what really sharpens them up. The next step was to cut back into the forms with the background colors to adjust the shapes just a bit. I'll often over paint a shape and then come back with another color to adjust it. You can see what I mean by this best on the head of the sheep to the far right. The last photo shows the painting after I decided to wipe two of the sheep out for a better overall composition. I knew I could always paint them back in if I decided I liked it better with all five.

Thursday, February 5, 2009

class demo step by step

This is a demo painting that I did for a small class back in September.
Colors were first pre mixed into about 9 or 10 main piles on my palette. That way I could compare the colors to each other and make some adjustments.

Then I blocked in the main shapes in Step 1 to show my students how to quickly build up the masses first with no modeling.
The goal was to just paint a flat shape of each pre mixed color.
We were all painting from the same photo and compared as we went along.


"Rooster and Hens" Step 1, Frank Gardner © 2008


Step 2. Once the canvas was pretty well covered, I started to adjust the shapes to get a more accurate drawing.
The focal point is around the rooster, so I started adding smaller shapes there first to define that area.
The hen in the back is not in the focal area, so I left that one rather vague. The silhouette is what describes to the viewer what it is.


"Rooster and Hens" Step 2, Frank Gardner © 2008


Step 3. I wanted to maintain simple shapes throughout the painting without breaking them up too much. I tried to add just enough detail to the alfalfa on the ground so you can tell that there is something there.
I was working all over the painting at once trying to unify the design without overworking any one area.


"Rooster and Hens", 10" x 8" oil on linen, Frank Gardner © 2008
Finished Painting
Private Collection


One thing that I like to do often is have a few brush strokes of a light value break into a darker mass, and in the same area, put a few strokes of a darker color into a light mass. I think that helps in the transitions from one mass to another. You can see it well around the rooster's head with the green in light and shadow. Those strokes are similar in size to the blue and orange on the tail feathers. There are also two similar strokes of dark green by the rooster's front leg or behind the hen's tail. Similar sized strokes like that help move the eye from one spot to the other. adding vitality to the painting. For this painting I wanted to keep your eye popping around a bit, kind of like the action of the rooster and hens pecking around in the alfalfa.

Sunday, November 9, 2008

Artist Umbrellas

Eric Merrell has written a great post on his blog about artist umbrellas.


I mentioned my new EasyL umbrella in a post last month, but Eric really goes into a bit of the history behind artist umbrellas and reasons for using them.

In his post, Eric shares a lot of good thoughts.
Among other things he mentions "color relationships". That is something that I always try and get across in my workshops. The way that one color looks COMPARED to the other colors around it.
Eric has a lot of good ideas on color and painting. It is worth a scan through the other posts on his blog if you are not familiar with it.

So go there now.

Friday, June 13, 2008

"The Lobster Pot"

The Lobster Pot Restaurant is one of my favorite Provincetown landmarks.
This painting was done from a photo reference on one of the rainy evenings during my trip to Cape Cod. I had really hoped to get back to Ptown to do some street scenes, but the weather kind of went sour on us. That should not have kept me from painting outside, but we just were not up for getting wet in a cold rain.
I need an umbrella.


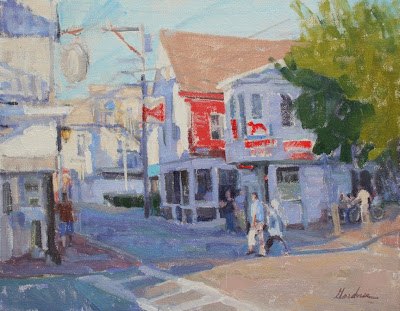
"The Lobster Pot", 11" x 14" oil on linen, Frank Gardner © 2008
$950. Framed. Available at Galeria Gardner


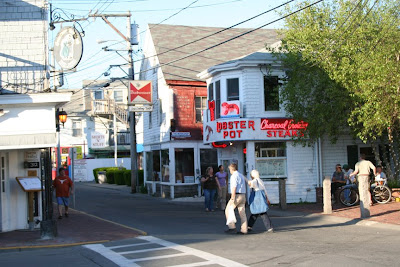
Reference photo for "The Lobster Pot", Frank Gardner © 2008


My friend Jack Riddle was talking about painting from photos on his blog the other day and suggested that I might write a few of my thoughts about that.

Here goes.

I always feel like I am taking a big risk when I post the reference photo next to my painting or a photo of the scene with the painting. Will all of my "mistakes" stand out like sore thumbs.

There are so many things to consider when using a photo reference. I could go on and on about pros and cons. One big con is that the values are usually a bit off. The darks are too dark and or the lights are too light and washed out. One pro is that it does not move and the light does not change, but that can be a con too.

Something I take into consideration when working from a photo is the look and or feel that I am aiming for in the finished piece. How much detail will I try and put into it. The problem with working from photos in the studio is that you can just keep going and going, adding in every little thing until it is really tight and probably over worked. It becomes a matter of taste and style.

The look that I decided on for this one was a solid design with a loose plein air feel. This was a plein air trip after all, and I wanted this painting to fit in well when hung together with the rest of the stuff from the trip.
I'm sure that this scene would look just as good if I had done a tighter job and brought it up to a more detailed finish, but that is not what I wanted in this particular painting.
By solid design I mean a strong pattern of light and shadow. Little details that are not real important can be edited out. Kind of like when I am plein air painting. Get the basic light and shadow pattern down first, add variety of color to the large value pattern, work up the detail in the center of interest. Get the important stuff down first, and then you can stop at any point.

The first thing that I did was evaluate two photos that I had of this street scene and chose the one that best suited my needs. I wanted the Lobster Pot to be the main interest, but the people are also an important part of Provincetown, so I wanted to feature them too. Couples walking, someone with a bike, that is all part of what makes it real. I liked having the building on the left to frame the street, but I did not want to add detail there that would take away from the Lobster Pot.

The neon sign is such an icon. I wanted to show it, but I did not want so much detail in it that it would hold the eye and not allow for movement in the painting. What I tried to get was the color and glow without even putting in any letters. It was one of the first things that I painted in. Almost pure cadmium red, thin enough to get the glow from the white tone of the linen showing through. Then I concentrated on just blocking in all of the shadow colors. I wanted to keep them lighter than what I was seeing in the photo. I tried to get a lot of variety in my colors but keep them all in a simple value range. I wish that I had taken some progress shots to help explain how I went about this.

Since I had determined that this would be a loose piece, working fairly fast was key. I approached it as if I was standing there on the corner trying to catch the important stuff first and fast. The big picture. When you see the reference photo along with the finished painting, it is easy to pick out little things that I did not include or may have drawn a little off, but is that detail important to the statement as a whole? Not for ME in THIS painting.
I'll try and point out a few examples of what I mean by lack of detail. Take a look at the budweiser sign. Did you know that it was a bud sign without having the words written out? O.K., my lobster may look a bit like a little red dog, but I bet that anyone that know Ptown knows that it is the lobster Pot. How about the tree? There could be a lot of picking at that and spotty leaves painted in, but the simple light/ shadow pattern works good enough in this case. The two figures in shadow walking in front of the restaurant. Can you tell that is two women? or at least feel the gesture of two figures walking casually? Good enough then. I think that the storefront windows behind them has just enough detail to know there is something in the window. When you stare at a photo you may be tempted to put in more and more in a thing like that.

I did not start adding any light family colors until I had a solid drawing down of color in shadow and most of it all linked together into a big pattern. Then I quickly laid in the light family colors. I put them in thick and then even scrapped some back off because texture always comes forward. I left the thicker stuff for the foreground and mid ground. I really had to rein in my urge to keep adding detail at this stage. My natural tendency is to make it all perfect. I wanted this to look like it could have been done on location in one go, so I stopped while I thought it still looked fresh. Could I have done some things differently? Sure. But each painting has to be thought of as an expression of your feelings. This is how I felt about it on this day. If I did it again today I might have a totally different set of colors and criteria.

That's all I'll write on my thoughts on this piece, and painting from photos for now. I'll probably end up expanding on this in the comments anyway. Thanks Jack for thinking that I might have some skills to share here. I'll work on some other posts along the same lines.

If anyone is still reading at this point, thanks.
I usually don't write such long winded posts.

Friday, April 4, 2008

Grab Bag Palette - "The Painting"

If you did not read my intro to the Grab Bag Palette, see here.
This one was fun. I was able to get much better color than I had feared when I picked my tubes. Purple Lake was out, so I had Magenta, Terre Verte, Cerulean Blue, Chrome Yellow and White.
Mixing lots of colors first, like I showed in my last post, was the way to go. That way I knew what I could do with what I had.
After making the value board, I scraped what was left into three piles of "mud" that were helpful to me in the painting.


My palette, with a lot of the colors that I will use in the painting, pre mixed. They are reflecting a lot of blue sky since I shot this photo in the shade.
That is some liquin in the bottom right corner of the palette.
The thing with an odd limited palette like this is that the mixes need to be seen RELATIVE to the other colors that you will be painting with. Perfect place for pre mixing some colors.

Below is the finished painting and a detail.


"Team Work", 6" x 8" oil on board, 2008
$500. Framed, Available at Galeria Gardner


Detail of "Team Work"


We are going to a Camp Out / Birthday Party for one of my daughter's friends tonight and tomorrow.
Have a great weekend.
As always, thanks for stopping by.

Friday, March 28, 2008

"Trees Along the River" - pre mixed palette

Here is another pre mixed palette and painting that I did this week.
I really liked the scene for its feeling of tranquility. I pushed the painting past the initial block in stage so I could layer the color a bit.
Barb Pask asked me to include a reference photo with one of these posts, so I added one at the bottom. I moved the composition around just a little.

I don't have a set number of colors that I mix up, although for the class I ask everyone to mix at least between 7 and 11 different colors. Sometimes you can get away with less. In this one I have more.
I'll often pick a color and mix it, then push part of that pile a little toward some other colors, say bluer or greener etc...but keep them in the same value. Then paint those three or four colors into the same mass to add some variety. The better you get at looking and seeing color, the better you will get at making those subtle mixes.
One of the main things that this exercise does is get you looking, seeing and learning to mix. You learn to compare colors on your palette and push them a little one way or another or dull them down a bit.

In the morning I am going out painting with a friend. I will take some palette photos and try to come back with something worth showing and talking about.


"Trees Along the River", 6" x 8" oil on linen, 2008
$500. Framed, Available at Galeria Gardner

Wednesday, February 20, 2008

Untitled Work In Progress-Step by Step

I am about done with this 11" x 14" studio painting. It still needs a few adjustments. The main thing is that I want to put a little foliage back onto the main tree in the middle. I'll let it sit for a day or two before I mess with it.
Here are a few step by step photos from along the way. They are pretty self explanatory, so I am just going to post them without rambling commentary. I'll post the finished painting once I've had a chance to wrap it up.
Some people have ask about my painting supports. This one is on a Raymar, single oil primed linen, panel. I use these, or Sourcetek panels a lot. Sometimes I use gessoed masonite boards that I prepare myself. For anything bigger than 24" x 30", I use stretched canvas.


"Xotolar", 11" x 14" oil on linen, Frank Gardner © 2008
$950. Framed, Available at Galeria Gardner

Monday, February 4, 2008

"Las Sombras del Ranchito"


"Las Sombras del Ranchito", 14' x 18" oil on linen, 2008
Private Collection


I am happy with the way this painting turned out. My method is not always the same with each painting. An artist should be like "Felix The Cat" and have many options in their "Bag of Tricks". That way, the process does not become too much of a formula.
In this painting, I wanted to get a lot of color into the shadows without breaking up the strong pattern of light and shade. I decided to start with one basic value for all of the shadows with lots of color changes not value changes. There is a lot of reflected light bouncing around in this scene. That made this part even more fun. I linked everything in the shadow into an interesting pattern taking care not to vary the values too much just yet. I did not paint any light colors until I was content with this step.
Sombras, by the way is Spanish for shadows.


Step One - Shadow Pattern


Below is the step one photo turned into black and white in Photoshop to show how there is pretty much just one value at this point. The only darker value is in the trees to the left, which I chose as my darkest shadow to judge the rest of my values against.
I checked the values in black and white as I was posting this, but you could take a picture of your painting along the way and try this to check your values. There are a few strays, but most of the values fall into a very limited range.
The next step was to add the color into the light areas. Again, I did not want too much variation in the values. I also did not put as much color variety into the lights. I wanted the shadow color to remain the focus.
Adusting the colors and values of both the light and shadow, I added some highlights and dark accents. This unified the painting a bit and made certain areas "read" better.
When I felt like I was thinking about the details too much I stopped.


Step One - Black and White

Thursday, January 24, 2008

Top Ten Books on Oil Painting- March Workshop

This is a list of Ten Books on Oil Painting that I recommend to students in my workshops.
I am only going to be offering one five day workshop in plein air landscape for oil painters this winter.
There are a few more arrangements to make before I list the dates and enrolment info, but it will be the first or second week of March '08. Monday through Friday. Five full days of painting landscapes around San Miguel de Allende, Mexico.
If any of you are interested you can email me at frank@frankgardner.com. I will be posting the dates and more information here soon. Class size is limited.

I have read each of these books many times. My copy of "The Art Spirit" has been read so many times that it has fallen apart and is now just loose pages gathered together.
Emile Gruppe is one of my all time favorite artists and his book "Gruppe on Color" is the most cherished book in my oil painting library. His books are out of print but they are worth buying used.

1. "Hawthorne on Painting" Hawthorne - Dover
2. "The Art Spirit" Robert Henri - Harper and Row
3. "Gruppe on Color" Emile A Gruppe - Watson Guptill
4. "Gruppe on Painting - Direct Techniques in Oil" Emile A. Gruppe - Watson Guptill
5. "Brushwork - A Guide to Expressive Brushwork for Oil Painting" Emile A. Gruppe - Watson Guptill
6. "Carlson's Guide to Landscape Painting" John F. Carlson - Dover
7. "Composition of Outdoor Painting" Edgar Payne -Payne Studios
8. " Landscape Painting Inside and Out" Kevin Macpherson - North Light Books
9. "Fill Your Oil Paintings with Light and Color" Kevin Macpherson - North Light Books
10. "Alla Prima" Richard Shmid - West Wind

I decided to limit my list to my ten favorites. Do you have other favorite books on oil painting techniques?

Friday, January 18, 2008

Value Board - Subtle Grays are not Mud


I love playing with color. On my palette I have a limited number of tube colors, but from these I can mix endless varieties of subtle grays. Some of these mixes can be classified as blue green, reddish purple, salmon, mauve etc. Others are harder to name. Because I mix my colors like this there is a harmony even among all these subtle grays.
Each of these subtle grays has a hue ( what color it is) and a value ( how light or dark it is). They also have chroma ( the intensity of the color).
As I paint, my palette fills with leftovers from my color mixes. To keep my mixing area clean I occasionally scrape leftover piles of similar color together and save them along the top of my palette. I'll use these grays to tint my new color mixes. (I'll write more on that and my palette in a separate post).
I have a little 6x8 board in my studio that I have been playing with. At the end of the day I'll take some bits from these piles of grays that are left and place them on my little value board. There is no real method to this madness, I am just playing. I want to practice matching different hues that are the same value and at the same time play with new color combos and see how they affect each other. I have been trying to place them in a kind of value scale from light to dark. It is not something super serious like mixing color charts. Sometimes I get them in the right spot, other times I really miss. It may look like a certain value to me when it is on my palette knife, but when I place it among the other colors on my board, it looks different than I thought it would. You see value is all relative. It all depends on the other colors that are surrounding. Sixty Minute Artist, Jerry Lebo, has great posts on relative value and learning to see values. If you are interested in learning more about this you should read what he has to say.
Some of these grays have a high chroma or are "purer" and others are "duller" or more neutral. when a high chroma color is placed amongst the "dull" ones it really pops. Like that orange one on the middle left or those lime greens along the top or that red on the top right. When seen in the black and white image they fall into place value wise. If I were to put a pure color straight from the tube imagine how it would look compared to all of these grays.
Along the bottom of this board I mixed a simple scale of ten values from black to white. My subtle grays are placed from light to dark in the opposite direction. There is no reason for that it is just how I did it. I have shown the same board in black and white so you can see the values without being distracted by the color. The ones I got in the wrong place really stand out huh?
I'll be writing more about my color mixing and limited palette soon.

Monday, January 7, 2008

"Into the Valley"


"Into the Valley", 11" x 14" oil on linen , 2008
$950. Framed, Available at Galeria Gardner

I have worked two days on this painting and it is time to stop.
For now at least.
My plan is to do a few small paintings along these lines. I think that this will make a nice larger painting, but I want to work with a couple of different compositions first and then go from there. I consider this a sketch for a larger painting, but also a finished painting in itself.
I like the opposition of lines in this one. I tried to emphasize the different directions of the hills and lines in the fields. I left the sky out completely. I am thinking that I will do another that pans back a bit to show a little sky.
Often, I will do a series of a few small pieces that might lead up to a larger painting. One of my reasons that I like to work this way is to be able to try a few different things without having to cram all of my ideas into one painting. It REALLY frustrates me when I overwork a painting. Once you go too far, you can never really recapture the freshness that was lost. I know this from having done it so many times. Working on a few versions of a piece can sometimes free me from feeling that I need to get it ALL just right. I can show a little restraint knowing that I can try it a little differently on a separate canvas. Another way that I try to keep myself from overworking a painting is to try and stop when I "THINK" it is about 90% "FINISHED". I'll set the painting aside for a while and come back to it with fresh eyes. Usually I will find that what I "THOUGHT" was the remaining 10% is not really necessary.
Does that make sense?

Sunday, December 9, 2007

"Hunter Gatherer of Light and Color" Part 2: The Light

When I am out painting on location one thing I try to capture is accurate color. It is really LIGHT that I am trying to catch, since an object's local color will look different as the light changes. It is the LIGHT that I want to use to convey my feelings about the particular scene that I decide to paint.
For part two of my "Hunter Gatherer" series of posts on plein air painting I am going to show two little plein airs that I worked on yesterday. I have been spending a lot of time in my studio or at the gallery and have not been able to get out and paint as much as I would like. I finally was able to make time to go painting yesterday morning. I decided to post these as is, before I did any re working or whatever is going to happen to them. I don't always come away with something to frame from my days painting on location. The experience of being out, looking, observing, absorbing is what I get out of it even if the only the only trophy I bring home is a wiped down canvas.


Work in Progress #1, 8" x 10"


Photo of scene #1

Let me say that I was not real happy with the way number one was coming out. I was a little rusty. That light was changing fast and I decided to stop working on this one and move on. I would rather stop at this point than try and "chase" the light and muddy everything up. The tree was going to be my focal point, but I totally blew it and did not get the tree blocked in correctly. I also was trying to add too many little bits and pieces of stuff and did not spend enough time working up a good composition.
What I did come away with were some nice colors and an image burned in my mind from having looked at this scene for about an hour studying it. When I look at the painting and the photo of the scene, I realize that I at least got my values accurate. The photo will help me get the drawing of the tree down. One thing that is hard to get from a photo are the subtle color shifts like in the hillside on the left side of the painting. The colors from my plein air sketch are more helpful to me than the colors in the photo.


Work in Progress #2, 8" x 10"

The second painting that I worked on is a little more finished. I took the time to block this one in a little better with a bigger brush before breaking down those big shapes into smaller brush strokes. Again, the color is kind of bleached by looking toward the strong Mexican sun, but it was the subtle shifts in value and accurate color that I was after. I really like painting this tree and how the mountains rise up behind it. The little trees in the foreground gave me a darker value to play off against the bigger tree. They are real important in helping with the sense of depth.
I am going to try and work with these today I will post later about what happens.


You might be able to gather from my posts that I really love being out in the Mexican countryside. There is usually action of some sort around. This is the time of year that the fields are being cleared. Corn stalks were being gathered yesterday where we were painting and it seemed like a constant flow of burros, horses and pick ups full of cornstalks.
Here are two photos of a friend, Marie, painting the same scene as #1, as loads of cornstalks go by. There really are burros under those first two loads.


Monday, December 3, 2007

American Artist Workshop- Step by Step


My demo, from the article "Frank Gardner: Using a Premixed Palette" in American Artist Workshop magazine, is now on the American Artist web site.
Subscribers are now receiving their copies of the Winter Issue and I have already received some emails about the article. The Winter issue will be in the stores Dec. 11th.
You can click here to see the Step By Step. I am hoping that more of the article will be posted soon.


I will be posting more about my plein air workshops over the next few weeks.
There are no workshops scheduled right now, but as soon as I have dates set I will post them here.


"Patsy's Cart", 11" x 14" oil on linen, 2007
Private Collection

Wednesday, November 28, 2007

"Woman and Doves"

Here is a painting that I did today. I took a few photos of the process so you can get an idea of how I worked this one up.
One of the choices an artist has when they begin a painting is to limit the value range that they will work in. This can greatly affect the mood of the finished piece.
My goal was to make this painting in a high value key. That means that the values are mostly light as opposed to darker. Tomorrow I hope to get a painting in a lower (darker) key that I will post here.


"Woman and Doves" Step 1

Another decision that I made before starting this one is that I wanted there to be lots of juicy and loose brushwork. So, I decided to work on this one upside down. That way I am thinking of shapes and colors and not "things". I have decided to show these first two stages upside down, just how I was seeing it when I was painting.

In step 1, I mixed up five or six shadow colors and laid those in rather quickly. I was not interested at all in details here, just getting my design blocked in with some nice variety of color. Notice that none of these colors are very dark in value. They actually look a little darker here than they really are because of all that white linen that they are being compared to. I love painting reflected light, and this scene had some nice light bouncing around on those buttresses.


"Woman and Doves" Step 2

In Step 2, I started to add the light family of colors. Again, I mixed up a handful of subtle color variations on my palette first so I could compare them to each other before committing them to the painting. Since I wanted this painting to have a loose look, these strokes needed to be put on and left alone.
Here is where I began to really work my edges leaving some hard and softening others. I am still working on the painting upside down. I did not start painting the color of the woman's clothes yet. I wanted to get most of my subtle colors down first so I could compare my color choices to the colors that are going to be around her in the finished painting.


"Woman and Doves" , 14" x 18" oil on linen, 2007
Private Collection


Here is the finished painting. I wanted the woman to be the center of interest, so that is where I put the brightest colors and some of the hard edges. I also added the doves here at the end so I could just lay them in loosely and not disturb them by trying to paint around them. I was careful where I placed them. I think that they add to the movement from left to right in the painting.


Detail "Woman and Doves"

I don't know why, but with blogger, it seems that the colors are always better when you click on the paintings and see the larger version. They are closer to the actual colors of the paintings.

Tuesday, November 27, 2007

"Hunter Gatherer of Light and Color" Part 1: Values

When I am out plein air painting I consider myself a "hunter gatherer". I am looking for bits of information, value relationships, light, color etc.. I "hunt" these things and I "gather" them.
In this post I will talk about gathering of values.

These images are from a painting trip to Maine that I took with some friends. I actually got a lot of painting done which is good, because I don't like to leave my family and travel thousands of miles to come home empty handed. It was my first time painting in Maine and it really took me out of my comfort zone of painting blue sky and things that, for the most part, don't move. Some days I got up to six paintings done. Other days did not yield as many, but I feel that even on the frustrating days I came away with something useful.

I will try not to ramble on here, I hope that these sketches speak for themselves, but I will try and give brief descriptions of why I am choosing these particular sketches to share with you.


"Misty Maine Sketch", 11" x 14" oil on linen, 2006

The weather was changing constantly it seemed. In this painting all I had time to get down were the basic value relationships of the main shapes. Then the sun came out and completely changed everything. By going for the important stuff first and not getting caught up in the details right off I got some solid relationships down and even though it is an "unfinished" painting I think that it stands on its own and is actually a nice piece. It gives a little insight into how I start a painting.
Since the light changed drastically, I set this one aside and started on another painting. To keep working on a painting when the light has changed so much would be a mistake.

Two of the most frustrating things about this trip turned out to be two of the best learning experiences of the trip. Here is what I mean.
#1 Boats move. Even when they are moored the turn and shift, especially on windy days.
#2 Maine lobster boats have a unique shape, their lines are not the same as other boats, and I needed to learn this.


Pencil Sketch #1

I don't do that many pencil sketches before I start a plein air painting. I am usually too caught up in the moment and want to get right to it. However, these boats were giving me trouble. Boats turning on their moorings and the changing light of partly cloudy days was getting me frustrated. At times I just had to take a step back and do some pencil sketches. I was trying to capture the lines of these boats in simple sketches of three or four values. On the left are three views of the same boat turning. On the right are also three views of one work skiff. I drew what I could and when the profile changed I moved on to the next sketch. These were just a few seconds each. I tried to get the basic shape down and added some values when I had time.


Pencil Sketch #2

Here are some more drawings done very quickly. In a few of them you can see how I adjusted my original lines. There was a man who rowed a boat out to the work skiff to turn on the water pump. In the drawing in the middle you can see the boat alongside the skiff. In the drawing on the right he is talking on his cell phone. These are just quick gestures, but valuable nuggets of information for future paintings.


Pencil Sketch #3

Here are some more examples of working quickly and hunting and gathering of values. It is not the details that were important to me but the relationship of a value compared to the values around it. Most of these have just been three or four values. The white of the paper being one, then a light gray, a medium and a dark. Look at the sketch at the top left. There is not a lot of "drawing" of the boat. It is really just a collection of shapes of different values. When these spots are put together in the right place it reads as the little boat against the dock.

I hope that some of you found this interesting. I'll talk about other things that I hunt and gather when I am out plein air painting in a future post.

Tuesday, November 13, 2007

"El Mexicano"


"El Mexicano", 18" x 24" oil on canvas, 2006
Private Collection

This is another painting that I like very much, for some of the same reasons that I discussed in my last post "Burro Bonito".
It has a lot of loose painterly brushwork. The few hard edges are reserved for the center of interest, the man and horse. The the rest of the painting is mostly soft and lost edges, which play a supporting role to the center of interest.
In this painting I wanted to convey the sense of heat from the hot sun, so I used a burnt sienna under painting, and let a lot of that color show through.
I paint a thin wash of burnt sienna mixed with lots of paint thinner all over the canvas. When it has set for about five or ten minutes I rub it down with a rag to even it out and leave a transparent wash which I let dry before painting over it. Always do this in a well ventilated area.


Detail "El Mexicano"

For this painting I used a reference photo that I took up the street from my house. There were a lot of trees and nopal cactus in the photo, but I chose to just hint at those so I would not distract from the man on the horse. The background is really just color notes. There is not much value contrast within all of that brush and cactus. That would draw too much attention away from my focus.


Detail "El Mexicano"

The sharpest edges are saved for the center of interest and so are my brightest colors. The red blanket, the yellow rope and the blue shadows on his white clothes are the three primary colors. Grouped together, they help draw attention to that area.
The lightest value in the painting is the white of the man's clothes. The next lightest value is the sky and a few of the cactus paddles behind the man's face that are getting direct sun. Since the man's face is in shadow, I just painted one main tone for his face. After laying in the shadow colors of his face and hat, I worked the negative space around his head and hat with the sky color. Notice how I continued with the same light value, but a different color (the cactus) on the back side of his head. Then, going down the man's shoulder and arm, I used one of the darkest values in the painting against the lightest. It was not like that in the photo, but I changed it to make it fit my needs. You have to be careful when you use photos to not just copy them blindly. I rearrange, edit or combine elements from other photos as needed.

Wednesday, November 7, 2007

"Second Wind"

It was one of those frustrating days that plein air painters sometimes have. We had staked out our location the evening before and returned the next morning ready to go. McLoon's Wharf in Spruce Head, is classic Maine, a few little red shacks where lobster boats unload their catch and lots of colorful fishing boats moored in the little harbor. I had visions all these great paintings that I was going to do in my mind. In fact, it was hard to decide which one of these masterpieces I was going to paint first. I settled my sights on one of the red shacks, pier, boat, some water, sprig of land in the background. I was going to get it all.
Well that didn't work, and that is how I got that nice toned canvas on "Second Wind".


"Second Wind", 8"x 10" oil on linen, 2006. Private Collection


I realized that my first try of the day was a failed painting after about ten minutes. Maybe five, but I kept hoping for the best for the other five. The positive side here is that I recognized that it was bad from the start and that no amount of picking at it was going to change that. So, I wiped it down and regrouped.
I went for a simpler composition. Instead of trying to get all of Maine into my 8"x 10" painting, I went for one lobster boat that had just pulled in to unload some traps, and just a slice of the pier. It was an old wooden boat, a classic, the kind with the sail in the back. I went at it with gusto after having loosened up with the first try. I blocked in all of the important stuff, got the lines of the boat down, added some pilings of the pier and the little boat that was tied up behind it. Then I worked the reflection of the sky in the water down along the right side.
O.K., now it was time for all the details. Or not, the owner of the boat walked over to have a look. "That's real nice" he said, "you got the shape down just right with so little. Looks just like her. Sorry to tell you this, but I gotta move the boat." I had about three minutes before he got back down into his boat and pulled out. I double checked a few shapes and made sure I had that bow line right and off he went.
I ended up being real happy with the result. I had captured just the important stuff, a good color harmony, and not a lot of fluff that may or may not have added to the piece. I hadn't had time to fuss over it and mess up all the good painting I had done in about fifteen or maybe twenty minutes. The name of the boat was "Second Wind" and I had gotten mine.

That High didn't last long. The rest of the morning continued to frustrate me. I walked around a lot. Checked out my buddies' paintings, snapped some photos. I Really could not decide what to paint next. Have you ever had that feeling? So I decided to do some pencil sketching. Some of them came out pretty nicely. Here are a few pages from my little sketch book. They are loose, just little value studies. I tried to get the gesture of the working men down and the lines of the lobster boats. I don't get to see many of those in Mexico. It really was a pretty good morning after all.